How site authorization works
To integrate Video chat with existing users' database and prevent unauthorized (hackers) access, all Flashcoms applications have a flexible authorization system. When an instance of an application opens, it calls the authorization handler which checks if a user is authorized. In return, the handler sends data in XML format.
If your site is Session/Cookies based then the handler uses the session/cookies user data to authorize.
If your site is not Session/Cookies based, you have an option to use UID (user identifier). You pass UID value to the application and it resends it to the authorization handlers to process the authorization.
The scheme below illustrates the calls sequence when a user opens a videochat instance:
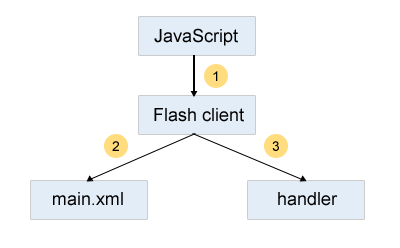
1. Javascript loads Flash client with following parameters: userName, roomId, langId, where:
userName – if specified, the parameter is passed on to the handler by GET method.
roomId - if specified, a user is forwarded directly to indicated room.
langId - if specified, the application automatically loads corresponding language.
2. Flash client loads settings from main.xml file and makes http request to the specified handler in accordance with enabled mode.
3. Handler returns xml formatted data back on Flash client query.
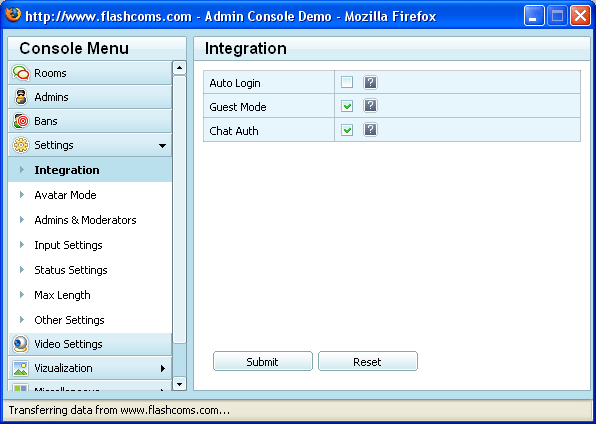
Chat integration settings
To manage chat integration settings enter Admin console > Settings > Integration
| Integration settings |
| Parameter name |
Description |
| Auto Login |
If enabled, the chat calls authorization handler and if user is logged in on the main site he/she enters the chat automatically. |
| Chat Auth |
Enables/Disables chat authorization. I.e. a user will be offered to enter his username and password on the chat login screen. |
| Guest Mode |
Indicates if non registered users (guests) can enter the chat. |
Integration steps
1. Open videochat admin console and expand Settings tab, click on Integration and set integrated parameter value to “true” as shown on the picture below (to learn more how to access administration please refer to corresponding section of the manual )
2. Create auth handler and specify it in the handlers section of settings file. For example, if you want to use site_auth.php file located in the root folder of your site the code will look like:
3. Write the code for your autho
<auth><![CDATA[
{ROOT}../site_auth.php&user_name={NAME}&password={PASSWORD}&uid={UID}
]]></auth> |
rization handler following the guidelines described in handlers section of this manual. Below you can find an example of handler code in PHP.
 |
<?php
//Connect to users database
$db = mysql_connect('localhost','database_user_goes_here','database_password_goes_here') or die(mysql_error());
mysql_select_db('database_name',$db) or die(mysql_error());
//Init request parameters
$userName = (isset($_REQUEST["user_name"])) ? urldecode($_REQUEST["user_name"]) : "";
$password = (isset($_REQUEST["password"])) ? urldecode($_REQUEST["password"]) : "";
$uid = (isset($_REQUEST["uid"])) ? urldecode($_REQUEST["uid"]) : "";
//Check if user filled login and password in the login screen (Chat authorization)
if($userName != "" && $password != "")
{
$sql = "SELECT * FROM users_table WHERE login='".$userName."' AND password='".$password."'";
}
//session/cookie base authorization (Auto login)
else if ($_SESSION['user_id']!="")
{
$sql = "SELECT * FROM users_table WHERE id='".$_SESSION["user_id"]."'";
}
// Non session/cookie based autologin authorization
else if ($uid!="")
{
$sql = "SELECT * FROM users_table WHERE id='".$_GET['uid']."'";
}
else
{
echo '<auth error="AUTH_ERROR" />';
exit;
}
//Select user data
$result = mysql_query($sql,$db);
if(mysql_num_rows($result)==1)
{
//User found. get user info
$usersInfo = mysql_fetch_array($result);
$photo = 'http://www.yourdomain.com/images/photos/'.$usersInfo['id'].'.png';
$photoModeImage = 'http://www.yourdomain.com/images/photos_small/'.$usersInfo['id'].'.png';
$answer = '<auth>';
$answer .= '<userName><![CDATA['.$userName.']]></userName>';
$answer .= '<gender>'.$usersInfo['gender'].'</gender>'; //male, female or couple
$answer .= '<level>'.$usersInfo['level'].'</level>';
$answer .= '<photo><![CDATA['.$photo.']]></photo>';
$answer .= '<photoModeImage><![CDATA['.$photoModeImage.']]></photoModeImage>';
$answer .= '</auth>';
echo $answer;
exit;
}
else
{
//User not found OR authorization failed
echo '<auth error="AUTH_ERROR" />';
exit;
}
?> |
4. You can keep parameters guestMode enable="true" and chatAuth enable="true", and if a user was not authorized by autoLogin handler, he will see Login Screen where he will be able to specify a username and enter the chat in Guest Mode.
Administrators/moderators management
To add/remove administrators in integrated mode you should add/remove user name in the admin console. Since the authorization goes through authorization handler the system does not check the password you have specified in admin console. In other words if you want user with login name David to be an administrator/moderator you just have to add him to admins list in admin console with a blank password. |